Pages

Showing posts with label Photography. Show all posts

October 5, 2010

Apple Cinnamon Clafoutis


Doesn't this look divine? This was the recipe we made for Cross Country Bakers last month. It's a French dessert made with apple custard-like filling. Mmmmm... I thought it was about time I posted a recipe for you all, so try this one out for your next dessert (or have it for breakfast like we did!). Enjoy!

Apple Cinnamon Clafoutis

Ingredients:

* About 3 or 4 apples
* 2 large eggs + 1 yolk
* 1/2 cup blond cane sugar
* 3 Tbsp. cornstarch
* 3 Tbsp. all purpose flour
* 1 cup whole milk, cold
* 1 vanilla, seeds removed (I didn't have vanilla seeds so I used 1 tsp. vanilla)
* 1/2 cup heavy cream
* ground cinnamon

Steps:

* Preheat your oven at 350ºF.
* Peel the apples and cut into cubes or slices whatever you feel is best for the oven dish you are using (I used ramekins)
* Beat the eggs and yolk with the sugar.
* Add the vanilla seeds and mix.
* Dilute the cornstarch in the cold milk.
* Add the flour and cornstarch to the previous preparation, with the cream. Mix well until homogeneous. Add ground cinnamon to your liking.
* Grease small ramekins (or a larger dish) and sprinkle with sugar. Remove the excess.
* Divide the apples  between them and pour the cream over.
* Sprinkle with ground cinnamon and place in the oven for 40 to 45 min, until golden. Remove. Eat warm or cold.

Original recipe from Jungle Frog Cooking.

August 12, 2010

Interview with The Joy of Jewelry

The Joy of Jewelry ButtonI had the pleasure of getting to know Joy, a lovely young lady who has recently started up her own jewelry business called The Joy of Jewelry. Her products are just *beautiful* and I am so pleased to be able to interview her! Enjoy the interview and when you're done, hop on over to her website and check out all the scrumptious gems she has to offer!

Kathryn: Can you tell my readers a little about yourself?

Joy: I am going to be turning 21 this year, I am a homeschool graduate and a pastor's daughter. I have done several years of independent studies on Nutrition, and am now attempting to learn to speak (and understand!) Irish Gaelige.

Kathryn: When did you start designing jewelry and why?

Joy: My sister and I always loved making dress-up jewelry when we were younger, and as I got older I began to buy some beads that were a little more 'grown up' than the plastic O's we used to string on thick, stretchy white string. I also read 'The American Girl's Handybook' that was in publication during the early 1900s, and became fascinated with the 'language' of flowers and colors. When I found a list of different colors and their significance in the Bible, that clinched my interest! I love the idea that we can be reminded of different truths, revealed to us through Scripture, by our jewelry.

Kathryn: How did you get the idea to start a business making jewelry?

Joy: When I was 16, one of the ladies we knew payed me to make two necklaces for her daughter's birthday and left the design up to me. Since then I have had many people tell me that I should sell my jewelry, and as I got older and saw the lack of really beautiful and sturdy (affordable) jewelry, I began to think that perhaps I might be able to do it after all. But it wasn't until a mutual friend introduced me to you - who offered to design a template for me in exchange for some jewelry - that I actually believed that it would ever happen.

Kathryn: What are your goals for your business?

Joy: My goals for my business are to glorify God as I create and sell jewelry, and to bless ladies across the country with beautiful reminders of purity and other truth.

Kathryn: You design each piece intentionally with certain colors or beads to represent things. How do you get your ideas?

Joy: I was fascinated when I discovered that there was an official 'language' to colors and flowers, and when I discovered a website that had a list of colors and their significance in the Bible, I couldn't resist incorporating different color combinations into my jewelry.
I get inspired by period films, nature, and modern fashion, and my jewelry is an attempt to combine the finer styles with purity and beauty.
As far as the truths that are represented by my jewelry, they are convictions and conclusions that I have come to as I read the Bible and learn more about Jesus. I try to give a little glimpse into my inspiration for each jewelry collection on my website.

Kathryn: What are your most popular pieces?

Joy: It would be difficult to pick the most popular piece because different ones appeal to different people. The Purity for Life pieces have been very popular - with many people commenting particularly on the delicacy of the chain that I use for the Exquisite Chain and Crystal Necklace and Bracelet - but probably the most popular piece is the Heart and Key Bracelet.

Kathryn: Thank you so much for allowing me to interview you, Joy! Keep up the good work!

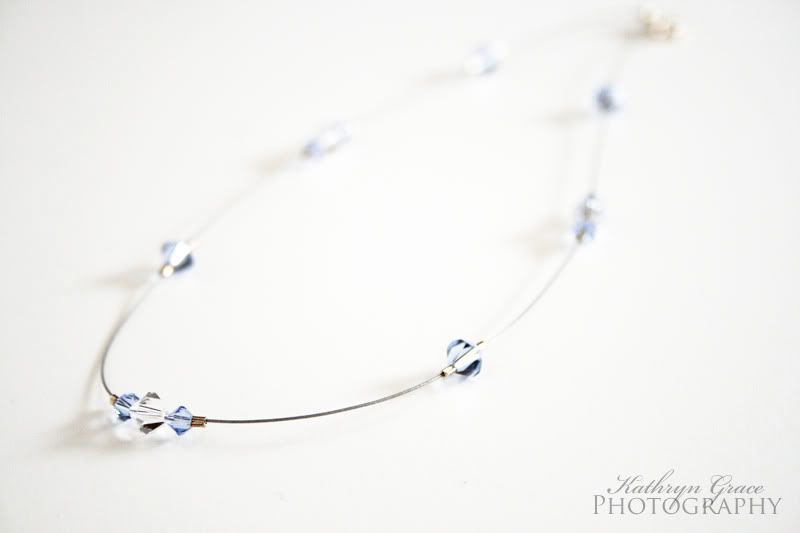
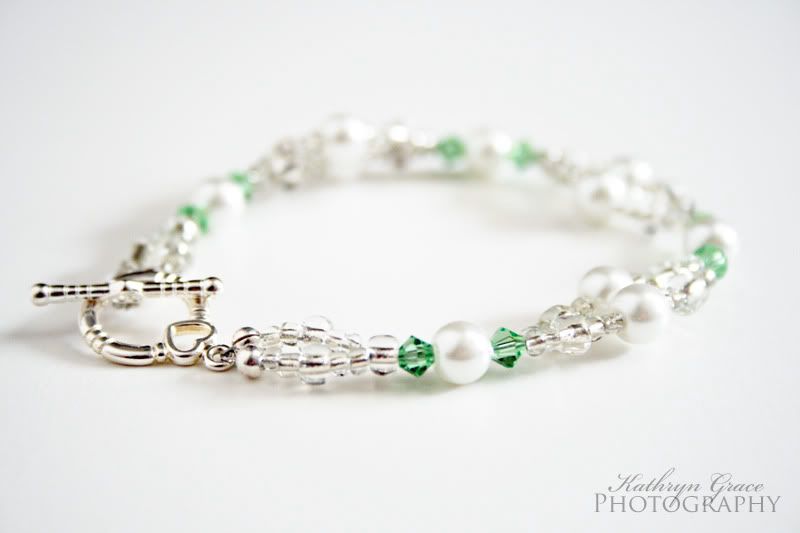
As she mentioned in the interview, I designed her website template in exchange for some jewelry. I received the Purity for Eternity Sapphire Crystal Necklace and the Purity for Life Double Stranded Bracelet. I am VERY pleased with both! The quality is excellent and they both fit beautifully. Joy's service was wonderful as well! I am a big Swarovski crystal fan so I love my two pieces! Below are some photos of the pieces I received (click on the picture to go to Joy's website and buy one for yourself!).

The Joy of Jewelry Necklace

The Joy of Jewelry Bracelet
Photos copyright © Kathryn Grace Photography.

June 21, 2010

Tell Me... Uh, Monday - My Harp!

Last Wordless Wednesday I posted this photo:

Harp Strings

I meant to post my Tell Me Thursday about it on Thursday like I was supposed to, but didn't have time. So it's coming late... on Monday.

Those of you who have read my blog for a while know I play the harp and I have been saving for my own bigger harp. Well, a little over a week ago I had a wonderful surprise. Back in March, I was able to order the harp, but the company was backed up on orders and told me it would be 6 months before it would be done. So I was prepared to wait till September to get my harp, and I was praying hard for patience (and at the same time praying that somehow it could be finished earlier - say, August).

Well, the Lord loves to answer prayers and He answered that one far beyond my hopes. A week or so ago I was working on a sewing project in the basement, and I heard a lot of screwing, banging around, and general racket going on upstairs. I, however, was deeply engrossed in making a ribbon flower, and absently thought my mom and sister must be hanging pictures (which would be very odd and besides, there was far too much noise to be only picture-hanging. But you must understand, ribbon flowers take a lot of focus).

Well, my mom called me to come up and "let the cat in." When I came up, Mom had a video camera in her hand. That meant something was up! I still was clueless and had no idea... I walked into the family room and there... was... I'm sure you can never guess. :-) Yep, my harp!!

Harp

Isn't she a beauty? It sounds beautiful and I LOVE the deep, full bass notes. It's been so much fun playing through all my old songs and hearing how much fuller they sound! Once again, a huge thank you to my friend, Raeanne, who let me play her little harp for nearly two years while I waited for this one... it was an immense blessing.

The Lord is good!

June 16, 2010

February 23, 2010

IHF Photo Contest

I'm entering another i heart faces photography contest! This time the theme is hands... Here is a photo I took a few years ago. I really didn't know hardly anything about photography, and yet it still remains one of my favorite photos. You can read the story below.

Bird in Hand

I had received my own camera for my 16th birthday, and we were out one weekend just doing yardwork, burning brush, etc. and I had my camera on me, as usual. I was out in the yard, and my mom was up on the deck off the back of the house, when she started calling me to come up and bring my camera. This little bird, which we later identified as a Ruby Crowned Kinglet, must have flown into the window and was laying on the deck, stunned. I took a few shots and then mom put on her gloves and picked it up. It didn't seem nervous or anything, but just sat there, and I got this wonderful photo. After that it fluttered off and landed on my sister's shirt and camped out there for a while. :-) Apparently it wasn't too badly injured because later it left. I love looking at this picture because of that memory and just because I like the photo - I like how the lighting came out, and the gray tones. When I decided to enter this one in the contest I tried editing it with Photoshop, and it looked nice... but I decided to go with the original photo after all.

February 4, 2010

Tell Me Thursday - Harp Heaven


Lyon & Healy Harp Showroom

I posted this photo yesterday for Wordless Wednesday. Amazing isn't it? It's not everyday you get to see a whole room FULL of harps.

Last weekend some friends of ours whom we had not seen in 3 years came up for a visit! Hannah, the older of the two, is an amazing harpist. I'd love to call myself a harpist - perhaps I can - but I have only been playing just over a year and am teaching myself. I have a small 27-string lever harp, which you can see to the right there. I am borrowing it from my incredibly generous friend, Raeanne, who is letting me use it until I can save up for my own harp.

Anyway, back to our guests. Friday morning we somewhat spontaneously decided to make the trip up to visit the Lyon & Healy harp factory. What a place! Perhaps it's just that I am in love with harp that made it so wonderful, but this place is amazing. We toured the factory and got to see how the harps are made. Did you know it takes about a year to complete a harp?! Now I know why they are so painfully expensive. :-)

After touring the factory (no photography allowed - sorry!), we were taken to the harp showroom, which was my WW photo this week. Dozens of harps all lined up in every size, color and kind. We were given a "salesperson" and a little room to the side, and any of the harps we wanted to play, they would wheel in for us! And we could play as long as we wished (it was a good thing we got hungry for lunch or we would have been there a really long time! :-) ).

Hannah requested to play a pedal harp designed by Carlos Salzedo, a modern harpist. This is not my favorite harp from L & H for its looks, but of course I wasn't going to NOT play it! The sound was just amazing and as you see from the pictures, it is HUGE, especially compared to what I am used to playing!
Playing the Salzedo Harp

If you are wondering the difference between a lever and pedal harp, lever harps have - guess - levers on them, which allow you to play your notes sharp or flat. Pedal harps use - surprise - pedals to play flats and sharps, and you work them with your feet which frees your hands. You can play more complex music on a pedal harp, and they are much larger with more strings (concert grands - what I am playing in the photo - have 47 strings).
Below is a photo of my favorite harp. I would probably have to save up my whole life to buy this, but it was amazing to play it even if just for a while!

Lyon & Healy Style 85 Harp

The harp I am currently saving for is a 36 string lever harp from Harps of Praise. Below is a picture of it:
Want to help me get my harp? Of course you do! :-) If your blog needs a fresh look or maybe you are just starting a blog...or maybe you just need a signature to end your posts or a button; head over to www.PrairieRoseDesigns.com. Or you can check out the Maidens of Virtue Shoppe. You can know you are helping the harp fund. :-)
Thanks for visiting!

February 3, 2010

Wordless Wednesday - Harp Heaven

Lyon & Healy Harp Showroom
Come back tomorrow to read the Tell Me Thursday for this photo!

January 9, 2010

i heart faces contest

I am entering a photography contest over at i heart faces, hoping to win a free Tamron lens!! The likelyhood of that happening is very slim, since there are some fabulous professional photographers entering, but at least I can say I tried, right? In order to be entered, I have to post these pictures here on my blog. Here goes...
Photo #1:
Panflute
This is my lovely sister playing her new panflute outside by our pond (how romantic, isn't it?). This is a beautiful instrument with a pipe for each note.

Photo #2:
Eppie
This is a little kitten we rescued, named Eppie. We named her after Eppie in "Silas Marner" because she was black (if you know the story, Eppie has to go in the coal shed as punishment for disobeying - hence the black part). She has flattened ears ready to pounce in this photo (I love it when cats do that)!

I am submitting these photos into the I Heart Faces logo photo contest. By entering, I am granting I Heart Faces LLC permission to consider my photos for use in the marketing and promotion of their website.

P.S. This is not the photo contest I mentioned before - more on that coming soon!

December 30, 2009

December 26, 2009

Decadence!

I looked up the word "decadence" in the dictionary and the definition it gave was "luxurious self-indulgence." That just might describe your experience when you make - and more importantly, eat - these little bits of chocolate delight.

Peppermint Chocolate Truffles

This is a winter tradition of ours that my sister and I make chocolate truffles every year. We've experimented with different flavors, like orange and almond, but we've found that our favorite by far (and the most popular among others) is the peppermint. Chocolate and peppermint seem to have been made to go together! Try these out and you'll see why.

Peppermint Chocolate Truffles

Ingredients:
1 8-oz.(eight ounce) package cream cheese, softened
3 cups confectioners' sugar, sifted
3 cups semisweet chocolate chips, melted
1 1/2 tsp. pure peppermint extract (or extract of your choice, such as vanilla, orange, almond)
Crushed peppermints for rolling, optional

Instructions:

1. Beat cream cheese until smooth in a large bowl. Gradually beat in confectioners' sugar until well blended.

2. Stir in melted chocolate until no streaks remain. Mix in peppermint extract. Refrigerate for about 1 hour. Shape into 1-inch balls and roll in crushed peppermints. Store in parchment-lined candy tins in a cool place. Makes about 60 truffles.
P.S. I'm having a year-end special over on my graphic design website! You will receive a FREE custom button with ANY purchase - even if all you buy is a signature or a pre-made Twitter background for $5 (buttons are $7! That's getting $12 worth for only $5!). For those who want lots of work done, if you purchase $50 or more in graphics you'll get the free button PLUS a free custom Twitter background! These offers expire at midnight, December 31st, 2009. Go to www.PrairieRoseDesigns.com to take advantage of this special! :-)

December 3, 2009

Tell Me Thursday - My Goofball

Once again, I apologize for the lack of posting. Sometimes life gets in the way and blogging is not always my top priority!

I decided that once in a while I will do Wordless Wednesday as I LOVE photography and this would be a good way to actually use some of the photos I take. :-) (Please note that my photos are copyrighted and may not be reused without permission).

And then the Thursday after, you can come back and read the story behind the photo - if there is one!


I posted the above picture yesterday for WW. This is my kitty. Her name is Gavana - fancy name, isn't it? That's because she is from Russia; she is a special breed which is (mostly) hypo-allergenic, which is important because both my sister and my dad are pretty severely allergic to cats! But with this breed, they are fine - strange, isn't it? The reason is that this breed doesn't have dander, which is the cause of most cat allergies.

Gavana is an extremely talkative, social cat as long as it is only the family around. The second she hears a car in the driveway she bolts upstairs and doesn't come out until the company has left!
She is quite the goofball sometimes, as you can see from the photo. :-) She enjoys sunning herself in very strange positions that look decidedly uncomfortable to me, but seem to be satisfactory to her. She gets in lots of trouble but we love her anyway! :-)

December 2, 2009

Wordless Wednesday - My Goofball

Come back tomorrow to read the Tell Me Thursday for this photo!

September 5, 2009

Apples!

Apples in Basket
Photo courtesy of my sister.


Our apples on our trees are starting to become pick-able, and picked they have been! We have two trees, and we're waiting on the other tree as the apples are smaller. These are green, those are red and green. We don't spray our trees (or at least we haven't yet so far) so lots of them have bad spots but you can always cut out bad spots. :-)

And then, this morning, Mom whipped up this WONDERFUL breakfast with our freshly picked apples:


A German apple pancake, baked in a cast iron skillet... OH. YUM. Wish you could have been here to enjoy it with me! (On second thought, maybe not, more for me! :-) ).
Anyway... just a little snippet from our daily life... I have some more serious posts mulling around in my head - I realize it has been quite I while since I did one of that nature. Thanks for stopping by!

May 6, 2009

I'm in love with crabapples!

The tree, I mean. :-) I've never tried an actual crabapple but around this time of year, the trees are bursting with blooms. I don't think it's possible to squeeze more flowers together. These trees are just loaded with flowers!! This is one of my favorite times of the year because I can go out with my best friend - my camera :-) - and take millions (that is almost not an exaggeration) of floral pictures! I'm sharing some with you. All of them are crabapple varieties except the fourth and last pictures, which are of our cherry tree, which I love just as much as the crabapple trees.


Images are Copyrighted © Kathryn Grace Photography

March 31, 2009

Cauliflower Wraps

A friend of mine sent this recipe to me and it's become one of my favorite lunches.

cauliflower wrap

And here's how to make it!

Ingredients:
approx. 6 flour tortillas

and....

Filling:
1 large head cauliflower
1 Tbsp. lemon juice
1 1/2 tsp. dijon mustard (I love dijon mustard, so sometimes I add more... :-) )
1/2 to 3/4 cup Almond Spread (recipe follows - you can also use mayonnaise, but the almond spread is really good!)
1 tsp. dried basil
1 tsp. dried oregano
1 tsp. dried thyme
1 tsp. salt

Cut the cauliflower into chunks and steam until very soft - about 15 minutes from the time there is actually steam. Meantime, make your almond spread. Drain the cauliflower if necessary and mash it with the remaining ingredients (I like to mix the remaining ingredients together first, and then add to the cauliflower). Set aside.

Almond Spread:
about 1/3 cup raw almonds
about 1/3 cup water
1/2 cup olive oil
1 Tbsp. lemon juice
1/2 tsp. salt
1 garlic clove, pressed (optional - my sister thinks it's too sharp with the garlic raw)
pepper or cayenne pepper if desired

Boil about 2 cups of water (separate from the 1/3 cup). Place the almonds in a bowl and pour the boiling water over them. Let them sit for about 3 minutes. Drain, rinse in cold water to cool and then squeeze the almonds to pop them out of the skins (fun for little kids who want to help :-) ). Place the almonds in a blender with the 1/3 cup of water and blend well. Add the remaining ingredients and blend until creamy, about 2 minutes.
(This will make more than you need for the wraps - you can save the excess as use as a healthy substitute for mayo on sandwiches, etc.)

Toppings:
1 to 2 tomatoes, chopped
lettuce leaves, torn
1 grated carrots
1/4 cup black olives, sliced (optional)
(you can add any other toppings you like)

Spoon cauliflower filling into tortillas and top with veggies. You can serve this warm or chilled. Fold up and enjoy!
Serves 3 to 4.

November 25, 2008

Fresh Irish Soda Bread...mmmm

irish soda bread

Nov. 26 update: For Miss Jocelyn and the rest of you who would like to taste this fabulous bread for yourselves:

Mrs. C.'s Irish Soda Bread

Ingredients:
4 cups flour, plus more for kneading
¾ cup sugar
¾ cup raisins
2 Tbsp. caraway seeds (optional)
1 tsp. baking soda
1 tsp. salt
½ tsp. baking powder
1½ cups buttermilk
2 large eggs
3 Tbsp. unsalted butter, melted, plus more for greasing pan

Instructions:
Preheat oven to 350°F. Butter a baking sheet.
In a large bowl, combine flour, sugar, raisins, caraway seeds, baking soda, salt, and baking powder. In a separate bowl, whisk buttermilk, eggs and 2 Tbsp. butter. Stir the wet mixture into the dry ingredients to form a dough.
Knead dough on a lightly floured surface until smooth, about 4 minutes; add more flour as needed to prevent sticking. Form dough into a 9-inch round; place on prepared baking sheet. Brush loaf with remaining Tbsp. of butter. Using a sharp knife, score an X on top of loaf.
Bake until skewer inserted in center comes out clean, about 45 to 50 minutes. Cool on wire rack before serving. Enjoy!
This is one of my absolute favorite breads! It mixes up pretty quickly and has a sweet flavor - sometimes we like to sprinkle the top with turbinado sugar (or other "large chunk" sugar) before baking. YUM!

July 2, 2008

Natural Beauty

White begonia

Purple Coneflower

Orange Daylily

White Columbine

Lilac